Monday, May 30, 2011

Fabulous Fish-ees

As I wrap up the last of my ceramic fish, I thought I would share some of my favorites. We spent three 45 min classes to create these and an additional 2 classes to complete the glazing after the bisque firing -

First class: learning about clay, how to manage clay dust, table set-up for clay and the technique used to 'pinch' the fish body & tail

Second class: learning how to 'score, slip & press' essential parts (dorsal & pectoral fins, eyes) to the basic form.

Third class: Elaboration!!! (tongue, teeth, texture, etc.)

I love the pattern on this one - very thoughtful choices.


The flirty wave this fish is giving - What a delight!


Have you ever seen a spoiler on a fish before?


Bows were contagious with some of the girls.


This one I call 'four eyes' for obvious reasons.


Here's Fang:


Great elaboration here!


Note: Fish were built with Laguna buff clay and color was added with Amaco underglazes and clear glaze.

Sunday, May 29, 2011

Finishing A Woven Pouch

A few of my students met the challenge of finishing their woven pouch before the end of the year. We really needed one or two more full class periods for the majority to complete their work. I may get a few more this week since 4 3rd grade classes will meet this week. I had a request from Angie to explain how I finish so I took some pix to help explain.


1. Weaving must fill the short side (front) and long side (back) completely - pack tightly so no warp threads show.


2. I weave a locking stitch for final row - this is done under the top row. Older students could do this themselves.


3. Demonstrate to the student how to 'pop' off the loops of warp along both top edges with the needle. Younger students can do this themselves.


4. Remove the longer warp on the edges and clip in half. Slide off cardboard loom.


5. Turn inside out.


6. Weave ends into pouch.


7. Ta Da!


In years past, I sewed a button on the front with a yarn loop for closure but faced with more than 170 pouches to finish, it was a daunting task...I've opted not to do it the past 2 years and the kids are just as happy with the tuck in flap. Students with a savvy sewer at home often get a fancier closure after taking the pouch home.

Saturday, May 28, 2011

Art Displays

In addition to the usual craziness at this time of year, I had to fit in a trip to district office to take down my 3D display.


Each art teacher in our district is required to put up either a 2D or 3D display (we rotate every other year) in our district boardroom. It's wonderful PR for our programs and our student's artwork so please excuse my whining.

The 2D artwork is located directly behind the school board dais on 3 large bulletin boards.


A smaller BB is opposite that wall, sometimes hidden by an ActivBoard (which is why my pix shows an awkward angle).


Glass display cases line the entry to the boardroom which was where my Wabi Sabi and coil pots along with the ceramic fish and mixed-media robots have resided for the past few weeks.


In addition, framed student work is on permanent display throughout the district office - Personnel, Payroll, Administrative offices, etc.


All of this was made possible through the efforts of both previous fine arts administrators and current colleagues who push to get our message of quality visual arts education out to our community.

Do you have areas other than your school site where student artwork is on permanent display? Please leave a comment sharing what you and your colleagues do to expose your students' work to a wider audience in your community...

Sunday, May 22, 2011

I Got the Boot


...for my left foot, that is! Apparently, running on the sidewalk can be harmful to teachers too. I wasn't actually running, just turning to run & catch the busses because of a few students who were leaving late at dismissal last Wednesday. Turned, twisted an ankle & SPLAT in the dirt in front of an audience of my peers. So to add to the end of the year crazies, I'm lugging around this boot on my foot because of a sprained ankle!

Since I have all my grades to finish, I'm putting my 'sit with foot raised' time to good use. As I complete 4th quarter grades, I note which students have earned award certificates for the year.

My students are eligible for these 5 certificates...

1. Young Artist - met Az Visual Art Standards in all 4 grading periods
2. Outstanding Young Artist - met or exceeded Az Visual Art Standards in all 4 grading periods
3. Exceptional Young Artist - exceeded Az Visual Art Standards in all 4 grading periods (student receives a bag of art supplies in addition to certificate)
4. Improvement Award - student improved by 3 grading levels over course of the year
5. Art Volunteer - awarded to any/all students who volunteered to help me in the Art room before school. Certificate lists # of hours student worked.

What honors/awards do you give out to your students at end of year?
Do you give out certificates or...?

Tuesday, May 17, 2011

Weaving in the Artroom - No Muss, No Fuss!

Third grade has started on their woven pouches and I'm a-hoping and a-praying that we can finish before the last day of school. Here are some pix of finished pouches from last spring...


The looms were cut and labeled...


warped and folded...


and some have started to weave....


Students will use yarn for their weft and yarn needles to speed the weaving along.
The safety rules for the needles are:

1. If you use it like a weapon (even pretending) it's a quick trip to the office & you will have to weave only w/your fingers.

2. I put the needles on the table, I pick them up at the end of class.

3. Do not walk w/needle in hand - tuck it in the pouch if you need to get up to show me your work.

Of course, I count the needles back in at the end of every class which reduces the chance that any needles 'walk' out the door! I ask the students to limit their colors of yarn to 5 - this ensures that even if we run out of one or two of their colors, there are still other possibilities. I pre-cut the yarns into approx. 30"-36" lengths to save time - I wrap several colors of yarn around the end of one of my 3' wide tables and then cut...

Here's hoping we finish before our last day on June 2nd...

Monday, May 16, 2011

Kumihimo Progress

Fourth graders are winding down the year with their Kumihimo maru dai looms, mastering the art of Japanese braiding. Everybody started with 2 colors, 4 pieces of each, with the same warping pattern to achieve a spiral pattern:


As soon as they finished their first braid and demonstrated mastery of the technique, they were able to choose any colors, in any combination, to create a new pattern/braid. We're starting to see some interesting new braids!


I'll post more color combinations as they're made...

Check out my previous posts for more details on the process.

Sunday, May 15, 2011

Watercolor Tip

It's that time of year when there are many events that conflict with my schedule - this week most 5th graders are headed up north to the Prescott National Forest for a 3 day stay, next week the PE Field Days are scheduled for K-5 and the usual problems of classes split because of a lack of subs. Of course this means that classes are canceled or shortened so I like to use the few remaining classes to try out new ideas or old, easy favorites.

I thought I would try circle paintings that I had read about on several other blogs. So 1st graders began by using watercolor to paint their circles. During the next class, we'll add more details with oil pastels. They enjoyed having more time to practice their watercolor and painting techniques.


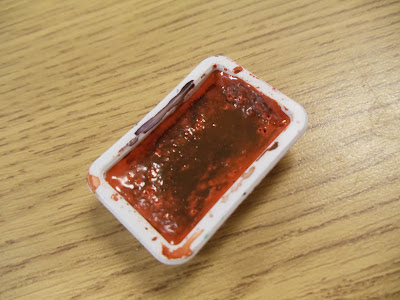
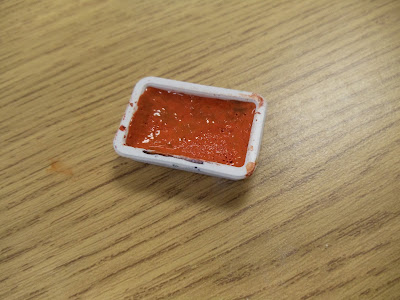
One tip that I've taught them is how to clean the watercolor pans. I prefer to use separate pans of color vs. a watercolor set. My sets would always get nasty-looking after just one or two classes & I find it's much easier to clean individual pans than a set.

Because it's inevitable that some students will mix colors in the pan rather than on the paper (as is always demonstrated), I show my kiddos how to clean up the mess left by someone else.


First, wet the paint with a clean brush...


then tear a small piece of dry paper towel and blot the pan.


Repeat if necessary and Ta Dah!! Clean pan!


I find this teaching/training empowers the kids to take care of problems themselves rather than expecting me to 'fix it'. Now if I could just get those OCD kids to paint instead of spending all their time cleaning the paints...

Saturday, May 14, 2011

Art Blog Updates

I did a little housekeeping here (distracts me from the MAJOR housekeeping I have to do in my storerooms at school) and updated my blog roll.


Now up to 133 Elementary (K-8) Art blogs at this writing. Scroll down to see a lising of the latest posts...

I deleted a few sites that haven't posted in a while (2 months or longer) and added a few more that I discovered on some of your blog rolls.

If I missed yours, please add a comment with your blog address. If you've found any of my posts to your liking, I'd sure like to be a part of your blog roll!

Letting Go

This time of year, I have a bit of separation anxiety as I return the last of this year's projects to the kids.

This student has been thrilling me with her artistic talents since kindergarten...

now she's a 5th grader and on her way to middle school next year.

One of the benefits of this job is seeing creative one-of-a-kind artworks-

this from a 3rd grader

and a pinch/pull technique ceramic fish from a 2nd grader


and one of my favorite 1st grade animal sculpture - with its habitat!


I wish I could keep them all...
but considering the chaos in my disaster zone (previously known as my storeroom) maybe not...

Saturday, May 7, 2011

Wrap It Up!

Sent home all of the 1st grade sculptures this week. I set up a table with everything I needed to prepare them for the treacherous route home.


Plastic bags (purchased on the CHEAP from Treasure 4 Teachers) in different sizes


Names printed out and pre-cut for easy tear-off


Stack of newspapers, roll of masking tape and stapler

My method for wrapping is to put the sculpture in a corner of a full newspaper sheet.


Fold over the corner


Fold over right side,


then left side,


Then roll it up gently, burrito-style.


Wrap tape around to close (not too tight!).


Place in bag & staple name tag to outside


My kids are told NEVER to put their clay pieces in their backpack but rather carry the bag in their hands. Can't remember a time when anyone told me their work broke before getting it home...

What method do you use?

More Elementary Art Blogs