Thursday, November 1, 2012

Color Wheels with Kinders and First Graders


Love this time of year - as we head into 2nd quarter, my kiddos begin the exploration of color in all its myriad forms...


The youngest artists get acquainted with basic color groups: primary and secondary through the use of a color worksheet.


Using only the primary colors of crayon, they discover the magic of color mixing.


In the weeks to come, they'll explore these colors through various media - in addition to crayon, we'll use tempera, watercolor and oil pastel.

Tuesday, October 30, 2012

2nd graders discover Jasper Johns


My second graders are finishing up their tempera paintings that were inspired by Jasper Johns (and my good buddy Barb!). The lesson began with a short presentation and discussion of Johns paintings that used numbers and letters as symbols.

Our first step was to draw numbers or letters in pencil that had meaning for each student. Tempera was painted over each symbol - each 2nd grade class (I have 4 groups) painted this step with the same color so it would be easy for me to sort later if the work was not labeled correctly by the student.

Each painted symbol was outlined in another color - student's choice!


The background was done by painting a variety of tints...


We were inspired by the words of Johns to "do something, do something to that and then do something to that" so we continued to add details of shape and line to add interest.


I'm so proud of their efforts!

Saturday, October 27, 2012

Art Teacher Benefits


One of the great benefits of our job is seeing the delightful work of our students on a daily basis. On Friday, I was grading some 1st grade collage work and just couldn't resist sharing the great expressions on their 'robots'.


There were a few angry faces...


along with some definitely female robots.


I've set aside some artworks for an upcoming bulletin board display so promise to share full-size robots soon...

Sunday, October 21, 2012

Art Lessons for the ActivBoard/Smartboard


Last Wednesday, I had a retired Art teacher sub for me while I was attending Grade Level Leader training. He's quite a techie & I was lamenting that I didn't get all of his flipcharts before he retired. Greg reminded me that they are all uploaded on Promethean Planet for anyone who would like to use them! Just type his name (Greg Patrenos) in the search function and browse to your heart's content. His speciality is Egypt studies...

Joining the site is free and there are many free downloads. Enjoy!

Monday, October 8, 2012

Meet Our New Addition


We have a new addition to our household that's taking up a bit of our time these days.


He/she is the first hatchling EVER from one of the numerous egg caches that our pond turtles lay throughout our yard every year. There was a sibling that escaped our temporary holding area that we have not found - I'm hoping it's hiding out in the pond!

It has an official name now that it has started to eat & has the vet-approved indoor set-up. Meet 'Little One'


We hope to put him/her in the pond with the parents (who shall remain anonymous since there are 3 females & 2 males and we haven't a clue who is responsible!) next summer.

Since our turtles lay 50+ eggs every summer, I'm concerned over this new-found fertility...

Sunday, September 30, 2012

Art Activities: Paper Airplanes


The Open Studio held in my artroom before school has a smaller crowd these days - weather is getting nicer so more students head straight for the playground nowadays. (The true measure of Fall in Phoenix is driving to work without the AC on.) That's okay - gives the rest of us a quiet space to do artmaking and gets our creative juices flowing.

A small group of boys that visit most days are enthralled with paper airplanes.


Last year, I used a rather grown-up paper airplane book that had fancy decorated papers included. Unfortunately, it was written on an adult level and the designs required more dexterity than little hands could manage. So I ended up making the planes during Open Studio & they ended up flying them. Not exactly what I had in mind...

This year, I started looking for more kid-friendly designs. Books are great but I knew I'd have several wanting to do the work at the same time so I turned to Pinterest for websites or blogs that could help me out. Bingo!


This site
has well-written directions (functional/instructional text) and easy to follow diagrams showing the step-by-step process. My third graders occasionally stumble over a word (orient - to align or position) but for the most part are able to work completely independently.

They have mastered all the basic designs and are moving on to intermediate constructions. I make copies of the printed instructions which go in a binder on the activity counter. Basic plane directions are printed on white paper and placed in a page protector. Intermediate and advanced plans are printed on colored paper to distinguish the different levels. Copies of the airplane templates are kept in folders on my desk. I provide one at a time so there's very little waste.


I was thinking this would be a great whole class project for a sub but for now we'll develop our skills in small groups...

Friday, September 28, 2012


It's been a busy week... Shape Man with kinder and 1st...
Jasper Johns-inspired painting with symbols underway...
Jean Dubuffet self-portraits in the home stretch...
Zentangles with 4th graders coming along nicely...
a few 5th graders finished with their Op Art/value studies inspired by a lesson from Mr. E's blog...
One more week (parent conferences week) then Fall Break - Woo Hoo!!

Saturday, September 22, 2012

If you had $50 to spend...


I had the good fortune to win a $50 gift card to Walmart at our faculty meeting this past Thursday. So now I have to decide what supplies to buy with it...Any suggestions? I'm leaning towards materials that are not consumable but I need ideas!!! I would love it if you would leave a comment and giving me some possibilities...

Saturday, September 15, 2012

Line Assessment

Kinder and 1st grades are winding up their line unit so time for evaluation! Students began their study of line by painting lines on the outside walls with water as a warm-up to using markers. After their line project drawings (which provide evidence of their ability to draw the 4 types of line taught: straight, curve, angle and broken) I assess to see if they know the vocabulary and can identify/sort the varieties before moving on to the next unit...

They play a quick version of the 'line game' I've written about in an earlier post. Directions for the test version are to hold up a card that illustrates the line I've asked them for. I glance to see if it's correct (they can have do-overs and I make note of errors on first attempt) then they place it on their corner of the table. After we've gone through all 4 of the choices, I walk the room & quickly glance to see how many they have correct laid out on the table corners. For kinders, we do the 'test' twice - first time through is a practice.


Next, each student is given one ball of plasticine clay and a placemat. The first class of the day needs to warm the clay by squeezing the ball - so we practice squeezing in the left hand then the right hand and so on until we've done about 10 squeezes. This softens the clay enough for their hands. I show them how to 'pinch' the clay between their thumb and curled fingers to break it into smaller pieces for our work. During this assessment, they are asked to make the lines using clay.

I demonstrate how to roll the clay between their upright hands using 2- 3 pieces of their pinched-off clay to create a coil. The first coil is labeled 'straight' and placed in the corner of the mat. The second coil is torn into pieces to create a broken line.


This is followed by a coil transformed into a curve line. Last is the angle line - I demonstrate how to use the coil to create the letter 'Z' by pinching the corners to make the sharp corners found in an angle line.


I pressed my examples onto the white board for easy reference...

Creating lines in 3 dimensions helps them apply their knowledge in a new way and gives me another opportunity to assess their fine motor skills. Sometimes, it also leads to a conversation with our Occupational Therapist for those students who simply can't manage squeezing and pinching of the clay....

Of course, all this hard work was followed up with extra practice for those little fingers...


Sunday, September 2, 2012

Class lists for the Artroom

So let's pretend that I have had all of my Special Needs lists returned (all but 2 at last count). Now I need to enter that info onto my class lists for daily reference.

I use my class lists for grades, attendance and behavior incidents. In addition, my lists include the class code, teacher's name, classroom number and the phone extension for that room.

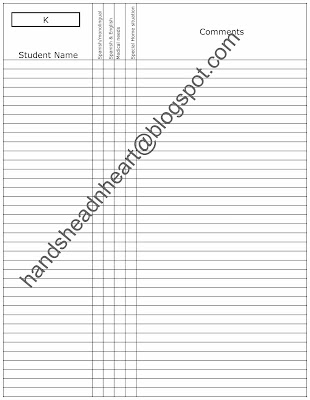
Here's an example of one of my 4th grade lists:


In the upper left hand corner is:
class code
Teacher name
room #
Ph #

Student names are listed on left hand side. That vast wasteland of empty cells in the spreadsheet will soon be filled with attendance, grade and behavior notations. Dates of class and descriptions of art projects are written at the top of each column.

Now you've probably noticed all the fancy schmancy colors & patterns going on in the student name column so let me explain...it's not just there for decoration (although I may tell the kids that if they go snooping!).

I use different colored fonts to designate different needs of students. This particular class is an SEI group (Structured English Immersion). Students in this room are still learning English - English skills can range from monolingual (Spanish), Pre-emergent, Emergent to Intermediate. Student names in this class are in a medium blue font with the exception of those who are monolingual (dark blue), those who receive Resource or Speech services (violet) or Non-reader (red font).

Several of these students have been identified as far below grade level and are given specific interventions to improve their learning. If there is no improvement over 60 days, they will be tested for SPED. I've designated them by highlighting their name space with pink. For students who are both SPED and non-readers, their name is violet and the background is a red diagonal pattern.

The numbered spaces to the left of names denote medical needs. I use red for allergies (food, bees,etc.), asthma, ADHD w/Rx or any other condition stated on the Special Needs list. Yellow means they may use the restroom as needed per nurse's direction. The specifics of the 'red' condition are written on the sheet directly under this one for easy reference...

This second example is from one of my Gifted Cluster classes - we have one of these designated at each grade level, K - 5. The gifted students in these groups receive services from a certified Gifted teacher who travels to our site once a week.


Gifted student names are in a green font. One of these students also receives Speech services so there is a violet diagonal line pattern in the name space as well. You'll see several kids that are highlighted in pink again because there is quite the range of abilities in these rooms. Something to keep in mind when I'm planning lessons...

Before the days of affordable color printers, colored pencils and highlighter markers were always at my side! Printing in color is a real timesaver but even coloring by hand paid off in the end.

Although this may seem like a lot of work (and it is - initially), the results are well worth it. A quick look through my lists every morning remind me of the learning needs of each of my groups that day which leads to far more successful lessons with each set of learners...


Sunday, August 26, 2012

The Importance of the First Day in the Artroom

So in my last post, I shared my Special Needs checklist. While I wait for that form to be filled out & returned, I need to gather info on my own about my students. So I use my eyes and ears during that first class.

During that first meeting I watch to see how individual kids follow directions. Since I use assigned seating on that very first day, I watch to see how the students handle my direction to find a matching card that shows where they will sit.


Are they focused on the task or easily distracted? If they didn't understand/hear my directions, do they ask another student, watch what others are doing or come to me for help?

Once seated, they'll fill out a sign-sheet at each table. On these sheets, I make notations throughout the class about what I observe: Are they listening? Following directions without prompting or re-focusing? Cooperating with those around them? Contributing to the class discussion or talking while I'm talking?

I have 2 activities planned once everybody is seated & signed in:
1. A PowerPoint presentation that explains rules, rewards, consequences, fire drill & lockdown procedures and an explanation of off-limit areas in my room (storerooms, my desk).
2. Assessment drawing


Assessment drawings earn the following designations: E - Exceeds grade level expectations, M - Meets grade level expectations or L - below grade level expectations and sometimes LL for far below grade level expectations.

Behavior & assessment notes/scores are entered on the class list for that first day. As the Special Needs info arrives, that is also entered on the same sheet. All the data is used when I make out the permanent seating chart. More on that in the next post...

Saturday, August 25, 2012

An Ounce of Prevention...

I'm a big believer in preventative discipline. One of the keys to that knowing your students. My planning for this starts before the first class...

To gather info, I created a Special Needs list. This document consists of a checklist for each teacher that contains their student names (copied & pasted off our district website). The categories on this list are: Resource (SPED), Speech, TST (our designation for students performing far below grade level but not labeled SPED), Gifted-Math, Gifted-LA (Language Arts - our school is the district magnet school for gifted), Non-reader, Monolingual/Spanish (80% plus of our student population is Hispanic), Fluent Spanish & English (these kiddos can help translate if seated next to a monolingual student and this also designates the student as an English Language Learner), Medical Needs (allergies, asthma, ADHD w/meds, etc) and new this year - Special Home situation (homeless, lives in shelter, newly divorced parents, etc.) There is also a 'Comment' section where teachers can explain anything not already covered in the list.


Kinder teachers have an abbreviated form since there is not a lot of info on their kiddos yet...


I hand each of my teachers their copy on their first day of class with me - the expectation that it will be filled out & returned asap. Some forms are returned that same day, some much later but I get all back within the first month of school. This information helps me form a picture of the class demographics and influences my teaching strategies for that particular group of learners. I send out the same checklist at the start of 2nd semester since our population is very transient plus the info for some students has changed since the start of the school year...

In my next post, I'll talk about how that info makes it way into my class lists (used for attendance & grades) as well as the seating chart.

Friday, August 17, 2012

Art Table Helpers


You've read here before how I prefer to appoint one person as a helper for each of my table groups. My room is s-m-a-l-l so I don't want everyone and their dog wandering around during clean-up time. I have found that most behavior issues arise during transition times so I prefer to have most kids in their seats while giving helpers specific directions on how to clean up in a timely way.

Anywho...there are always a few who take it on themselves to 'help' the helpers so I was inspired this summer to identify those who should be out of their seats and those who should not. I was shopping at my fave, Treasures 4 Teachers and found blue, printed lanyards in the stuff-a-bag-for-$5 section that seemed just the ticket!

So I tried them out our first week back & the kids felt really special wearing them but...the lanyards didn't 'look right' to me. The curse we carry with us - for something to earn a place in our rooms, 'it' has to 'look right' - right?!

So, I tried sewing a 'sleeve' of patterned fabric over the printed lanyard which was more artsy looking. But it was too time-consuming and my sons (ages 19,23 & 26) said they were too 'girly'.

So then I crocheted a rainbow of cotton yarn over the blue fabric but again was told by my boys that NO boys would ever want to wear them so back to the drawing board!

By now I was thinking of making/sewing my own lanyard with ribbon and keychain rings. Fortunately, I was able to find a rainbow (color wheel) grosgrain ribbon at JoAnn's fabric store.

The tags needed to be able to withstand constant pulling, licking, chewing, etc. so I cut up some of my valuable plastic trays.


I cut the table numbers out of scraps of wallpaper or magazine pages and used book binding tape to secure it all together. The 3-hole power punch in the office was used to punch a hole in the top.


I installed a row of hooks on the side of a cabinet to hold all the lanyards when not in use.


After a week of classes, I can say that it is a rousing success on many levels. The kids take pride that they have something the others do not. The students can easily identify who their helper is that day. I can easily identify who's missing when I'm giving clean-up directions as well as who's wandering when they shouldn't be...


But I still may tweek them a little, I'm thinking about making the numbers more brightly colored - they don't seem quite 'right' yet...

More Elementary Art Blogs