Showing posts with label 4th grade. Show all posts

Sunday, September 30, 2012

Art Activities: Paper Airplanes


The Open Studio held in my artroom before school has a smaller crowd these days - weather is getting nicer so more students head straight for the playground nowadays. (The true measure of Fall in Phoenix is driving to work without the AC on.) That's okay - gives the rest of us a quiet space to do artmaking and gets our creative juices flowing.

A small group of boys that visit most days are enthralled with paper airplanes.


Last year, I used a rather grown-up paper airplane book that had fancy decorated papers included. Unfortunately, it was written on an adult level and the designs required more dexterity than little hands could manage. So I ended up making the planes during Open Studio & they ended up flying them. Not exactly what I had in mind...

This year, I started looking for more kid-friendly designs. Books are great but I knew I'd have several wanting to do the work at the same time so I turned to Pinterest for websites or blogs that could help me out. Bingo!


This site
has well-written directions (functional/instructional text) and easy to follow diagrams showing the step-by-step process. My third graders occasionally stumble over a word (orient - to align or position) but for the most part are able to work completely independently.

They have mastered all the basic designs and are moving on to intermediate constructions. I make copies of the printed instructions which go in a binder on the activity counter. Basic plane directions are printed on white paper and placed in a page protector. Intermediate and advanced plans are printed on colored paper to distinguish the different levels. Copies of the airplane templates are kept in folders on my desk. I provide one at a time so there's very little waste.


I was thinking this would be a great whole class project for a sub but for now we'll develop our skills in small groups...

Friday, September 28, 2012


It's been a busy week... Shape Man with kinder and 1st...
Jasper Johns-inspired painting with symbols underway...
Jean Dubuffet self-portraits in the home stretch...
Zentangles with 4th graders coming along nicely...
a few 5th graders finished with their Op Art/value studies inspired by a lesson from Mr. E's blog...
One more week (parent conferences week) then Fall Break - Woo Hoo!!

Wednesday, April 4, 2012

Gearing Up for Annual Art Show

Late nights every day this week as I scramble to get projects ready for our art show.

I did a quick load of Wabi Sabi pots yesterday.


A few of the 3rd graders need to come in at lunch to finish glazing their coil pots...


while 2nd grade artists need to do the same with their effigy vessels.


Ceramic dragons were painted with watercolors so no kiln necessary - woo hoo!


And after all that, I have to select, mat, tag and fill my six-sided panel with an assortment of our 2D work, including some Blue Dog paintings.


Show opens on Monday, should have pix posted by the following weekend. In the meantime, you can click on '2011 art exhibit' in my labels section to the right to see last year's work!

Monday, May 16, 2011

Kumihimo Progress

Fourth graders are winding down the year with their Kumihimo maru dai looms, mastering the art of Japanese braiding. Everybody started with 2 colors, 4 pieces of each, with the same warping pattern to achieve a spiral pattern:


As soon as they finished their first braid and demonstrated mastery of the technique, they were able to choose any colors, in any combination, to create a new pattern/braid. We're starting to see some interesting new braids!


I'll post more color combinations as they're made...

Check out my previous posts for more details on the process.

Friday, May 6, 2011

Kumihimo: The art of Japanese Braiding

Fourth graders have made their maru dai braiding looms and started their first braid. If you haven't heard of this artform before, check out a previous post of mine for background and details.


Students watched a Keynote presentation giving the history of Japanese braiding - Samurai warriors were proficient at creating kumihimo braiding which secured their armor for battle. When not at war, they made and sold their braids to support themselves and their families.

My students made a loom from cardboard and warped it using 8 pieces of yarn - 4 pieces of a light color and 4 pieces of a dark color. To simplify things for me, each 4th grade class uses a different 2-color scheme - easy for me to identify which class the work belongs to if the name tag gets lost.


Most caught on to the rhythm of the pattern quickly,


others will take longer...

Fortunately, those who finish quickly can move on to a second braiding using any color combination so I'm free to give one-on-one help to those who need it most.

Sunday, April 17, 2011

Storyteller Progress

Some classes are finished constructing their storyteller sculptures...

A week or two to dry and bisque fire then we can begin to paint. I'm thinking I'll keep them to a limited palette of browns, black, white and maybe turquoise...


And another view...


I think the animal figures have turned out much better than the human figures this year...


but we'll see what happens after the bisque firings...hopefully there will be no explosions or other surprises in store for me!

Monday, March 14, 2011

4th Grade Dragons


On Spring Break here (or as I like to call it - Woo Hoo Week) so of course I had to spend the first day working in my room. Sorting through stacks of graded work for examples that can go in our Spring Art Show, shoveling out *stuff* from the storeroom, going through new 'donations' from a teacher leaving at the end of the year and cutting up cardboard boxes for braiding looms.

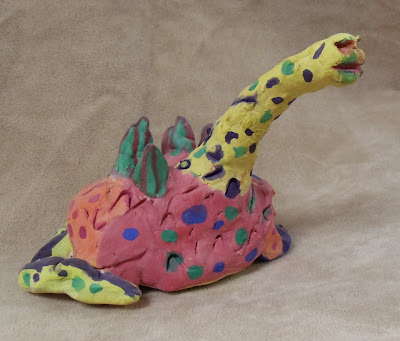
I thought you might like to see pix of ceramic dragon rattles we made in 4th grade a few years ago...


These artworks were kept for an end-of-year exhibit that somehow did not get back to their owners. I keep them in a glass display case until they're claimed...


We made the base for these by connecting 2 pinch pots with a few clay beads inside for the 'rattle'. After viewing many examples of dragons from China and other cultures, we added legs, tail, neck & head. Some students went further with wings, spiked tails and multiple heads...


Last step in formation was adding a variety of textures. Color was added with watercolor after the bisque firing. I encouraged pattern when painting to 'jazz it up'!


This year, my 4th graders are creating Storytellers (pictures in few weeks) but I may go back to dragons next year - they always have such great personalities!

Monday, February 21, 2011

Rockin' Robots

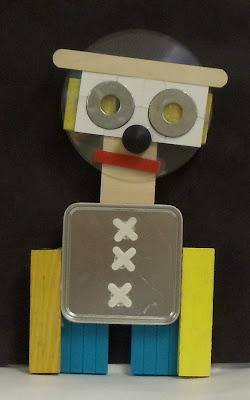
Just had to post pix of my colleague's latest project with her 4th grade...


Our school is large enough to have 2 art teachers - myself with 29 classes in 5 days and a traveling art teacher who meets with 12 classes in 2 days. She travels to 4 different district schools throughout the course of the week, teaching 30 classes of K-5.

Although we have lunch together on Fridays, our class schedules are so similar that I rarely get to see her projects. This past week, she had a sub so while I was showing the sub where to find materials I glimpsed these radical robots her 4th graders are finishing.


This little guy had a secret compartment...


She collected these materials from a variety of sources - Treasures 4 Teachers, Goodwill and scavenged materials from discards here 'n there. Elmer's Glue All was used to attach most of the small stuff and a glue gun (teacher only) was used for bigger stuff.


Now that the robots are completed, students will draw their creations in pencil to compare/contrast 2D and 3D artwork.

Tuesday, February 1, 2011

Thoughts

Today is my last day of sick leave and I'll be heading back to the classroom tomorrow. I've been fortunate to have had 2 very competent subs while I've been gone so it won't take long to get back into the swing of things.

Most grade levels have to finish up work we started before my surgery so lesson planning won't be too difficult.

First graders will use their crayon rubbings to create an imaginary animal in its habitat.


Artists in 2nd grade will start to add final details on their Blue Dog paintings - can't wait to see what they come up with!


Both 3rd and 4th graders have to pull together their prints made previously, assemble them according to the edition numbers and complete the self-assessment rubric.


Fifth graders will soon start on their ceramics - a Wabi Sabi pot (hope I spelled that right...). I took a great hands-on workshop at state conference last fall on the subject and thought it would be perfect for them !

I hope all of you out there enduring the Snowpocalypse make it through the next few days days warm, dry and safe from accident or injury! Most of my immediate and extended family is in the direct path so even though I'm sitting here with the sun shining through the window my thoughts are with those in the Midwest right now. Enjoy your snow days!

Tuesday, January 25, 2011

Kumihimo Braiding


To pass the time here at home & to keep my fingers busy, I'm working on some braiding work. I discovered Kumihomo braiding about 2 or 3 years ago. A project was featured in the book, You Can Weave: Projects for Young Weavers.


I wanted a project that was clean and cheap but that was more than just a craft project. This filled all the qualifications. Materials are simple - cardboard square and yarn. I use a basic 8-strand braid successfully with 4th graders but there are far more intricate patterns that could be used with older students. I recommend the book Braids: 250 patterns from Japan, Peru & Beyond if you are looking for the intricate patterns and a more in-depth text of the braiding practices found around the world. Get a copy quick - it's out of print!


Now, for the historical background: Kumihimo is a method of braiding silk threads developed in Japan. It is traditionally performed on special wooden stands called Maru Dai and Takadai. The literal translation of kumihimo means the "coming together (kumi) of threads (himo)". Kumihimo braids were originally used as ties, cording and belts for clothing, and closures for Samurai armor. The Samurai training and culture included the expectation that the warriors be able to make and mend their own kumihimo cords. The Samurai warrior was able to make a living from his kumihimo skills when his fighting abilities were not in demand.


There are online PDF's to be found on Talzhemir's Kumihimo Page or get a free round marudai template here. Like me, you'll probably develop one of your own based on your students after seeing the variety out there.

There is also a foam version that I purchased at Joann's after seeing one of my students with one - she scored hers at Goodwill at a fraction of the price I paid! You can find it here (on sale right now!) under the name Weave Wheel. Although it is sold as a lanyard maker, it is perfect for kumihimo. I LOVE mine! Of course the cardboard version is much more reasonably priced (FREE) while the foam version is much more durable.


You can use a variety of materials to braid. I use yarn in my classroom for the assignment - the first one is always done with only 2 colors, 4 pieces of a light color and 4 of a darker, contrasting color. Once students are proficient at the process, encourage them to use a variety of thicknesses and colors in their braids.

At home, I usually use embroidery floss. Here are some pix of what we're working on here:


This is one my son (teenager) is working on - he's using the foam loom with 7 black threads and one blue.


Hopefully he won't lose another house key now that he can wear it around his neck!

This is a cardboard (matboard) loom used for a flat braid. I'm making this braid for son #2 in his college colors - Go Mizzou!


If you're interested in specific braiding procedures, send me an email!

Monday, January 24, 2011

Storyteller Dolls Part 2


Sorry for the delay in posting Part 2 but I had inadvertently left my camera at school so had to send someone to retrieve it. Steps are illustrated using Play Doh which has not been in our house for YEARS now so please excuse the poor construction details - ceramic clay is SO much easier to shape and blend....

To build a storyteller, students begin with a slab for the base, a coil/cylinder of clay for torso, smaller coil/cylinders for legs/feet and arms/hands with a sphere for the head. Hair could be painted on later in the process or made of clay - many chose to make braids or buns for the human figures.

Step 1: Use a ball of clay and press it into a small slab for your base. (While students could choose to do a standing figure, none of my 4th graders did it successfully without a base to balance their sculpture).


Step 2: Build a thick cylinder for the torso and attach to base. I use a 'score, slip, press' method for attaching my clay pieces.


Step 3: Make 2 cylinders for legs. Attach to bottom of torso AND base with 'score, slip, press' method. Form ends into feet shapes.


Step 4: Make 2 cylinders for arms. Attach to top edges of torso AND tops of legs where they will rest with 'score, slip, press' method. Form ends into hand shapes.

Step 5: Form a ball for head shape. Attach to top of torso with 'score,slip, press' method. Make sure students then blend the 2 pieces to make a neck transition between pieces so it looks more natural (hard to do with Play Doh...)


Students went on to adding details to their main figure: hairstyle, facial features, clothing, drum, bowl, etc. When ALL details were finished AND assessed by me, they could begin adding the smaller figures.

Smaller figures (children or small animals) were made using small coil/cylinder and ball shapes. Make a short slit at the top and bottom of the coil/cylinder and bend into arms and legs. Attach the ball as the head. Add details.


Attach smaller figures with 'score, slip, press' method in various places on the main figure. Some students were adept at creating clay details for the children but most just used paint to add detail. All my students were expected to have at least one small figure attached for the work to be considered 'finished'. Most had many more than that...


Some students opted to have animal storytellers - so they needed to develop a plan for the major body shapes needed for the figure. Popular main animal figures were bears, turtles, or dogs.

Once again, remember that small figures, whether children or small animals, are made when ALL details on main figure are completed.

When constructing the sculpture it's important to remind the kids that ALL views should be interesting in a 3D artwork.


This was a lengthy project but the kids were very engaged from start to finish. Due to the thickness of some pieces, the artworks were left to dry for 2 weeks before firing. When I labeled the greenware on the final day of completion, I used a 6" weaving needle to pierce the thickest sections (in a hidden area) to enable quicker drying and lessen the chance of explosions during the firing.


Students later added color with watercolor paint - brown for skin areas and limited colors for clothing. Animal figures are painted in realistic colors. I've also seen student work done using only black, white and tan for the color palette.

I think glazes would be more appropriate for older students who have better fine motor skills. I did allow my students the option to add facial features with a fine, black felt-tip marker, which turned out quite well.

I hope to repeat last year's success and will be sure to post pix as we go along this year. Enjoy!

More Elementary Art Blogs